How To Upgrade/Clean Install Windows 10
(During the installation process, you need to use the license we emailed to activate.)
Method 1: Upgrade/Clean Install Windows 10 from Windows 7, Windows 8.1, Windows 10 using Microsoft download link:
- Download Tool Now
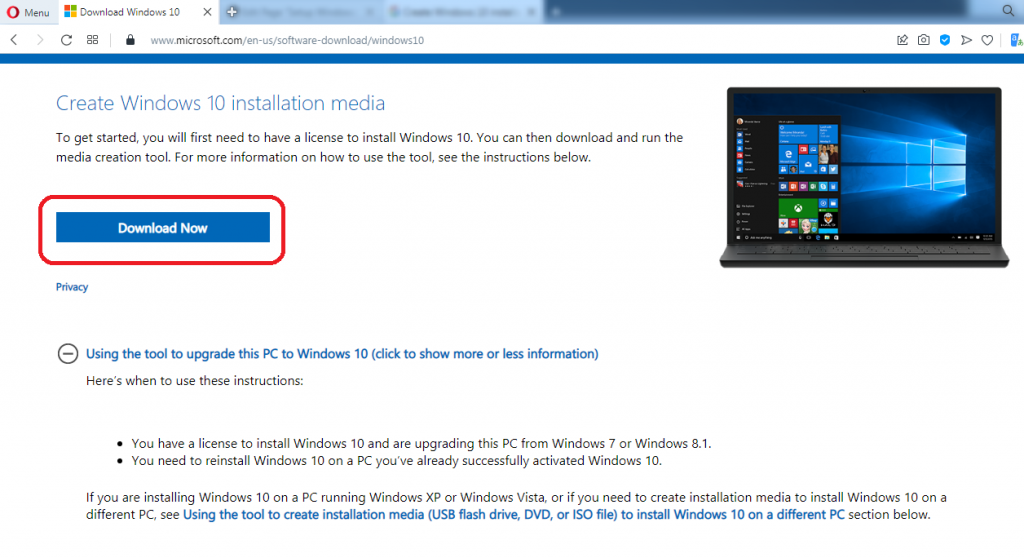
- Open Windows 10 download page. Under the “Create Windows 10 installation media” section, click the Download tool now button to save the file on your device.
- Double-click the MediaCreationToolxxxx.exe file to launch the tool. (You need to be an administrator to run this tool.)
- Click the Accept button to agree to the Microsoft terms.
- On the What do you want to do? page, select Upgrade this PC now, and then select Next.
- After downloading and installing, the tool will walk you through how to set up Windows 10 on your PC.
- During the installation process, the tool will ask you to enter a license to activate. You need to open the email containing the license you purchased to activate Windows 10.
- When Windows 10 is ready to install, you’ll see a recap of what you’ve chosen, and what will be kept through the upgrade. Select Change what to keep to set whether you would like to Keep personal files and apps, or Keep personal files only, or choose to keep Nothing during the upgrade.
- Save and close any open apps and files you may be running, and when you’re ready, select Install.
- It might take some time to install Windows 10, and your PC will restart a few times. Make sure you don’t turn off your PC.
[Fix] Media Creation Tool Error 0x80072F8F – 0x20000
When you attempt to upgrade to Windows 10 from a Windows 7/8 computer using Microsoft’s Media Creation Tool, the error 0x80072F8F - 0x20000 may appear. The full error message verbatim is below:
There was a problem running this tool

We're not sure what happened, but we're unable to run this tool on your PC. If you continue experiencing problems, reference the error code when contacting customer support. Error code: 0x80072F8F - 0x20000
To resolve the Media Creation Tool Error 0x80072F8F – 0x20000 error on Windows 7 and Windows 8 computers, enable the TLS 1.1 and TLS 1.2 protocols. Follow these steps to do so:
- Make sure your system is fully updated.
- Open Notepad.
- Copy the following lines into Notepad.
Windows Registry Editor Version 5.00

[HKEY_LOCAL_MACHINE\SOFTWARE\Microsoft\Windows\CurrentVersion\Internet Settings\WinHttp]
"DefaultSecureProtocols"=dword:00000a00

[HKEY_LOCAL_MACHINE\SOFTWARE\Wow6432Node\Microsoft\Windows\CurrentVersion\Internet Settings\WinHttp]
"DefaultSecureProtocols"=dword:00000a00

[HKEY_LOCAL_MACHINE\SYSTEM\CurrentControlSet\Control\SecurityProviders\SCHANNEL\Protocols\TLS 1.1\Client]
"DisabledByDefault"=dword:00000000
"Enabled"=dword:00000001

[HKEY_LOCAL_MACHINE\SYSTEM\CurrentControlSet\Control\SecurityProviders\SCHANNEL\Protocols\TLS 1.2\Client]
"DisabledByDefault"=dword:00000000
"Enabled"=dword:00000001
- Save the file with a .reg extension — e.g.,
enable_tls.reg - Double-click the
enable_tls.regfile to apply the settings into the registry. Click Yes when asked for confirmation. - If you’re using Windows 7, download the KB3140245 package (TLS 1.1/1.2 enablement update) from Microsoft and install it. This step may not be needed for Windows 8 and Restart Windows.
https://www.catalog.update.microsoft.com/search.aspx?q=kb3140245
Method 2: Upgrade from Windows 10 Home to Professional using CMD
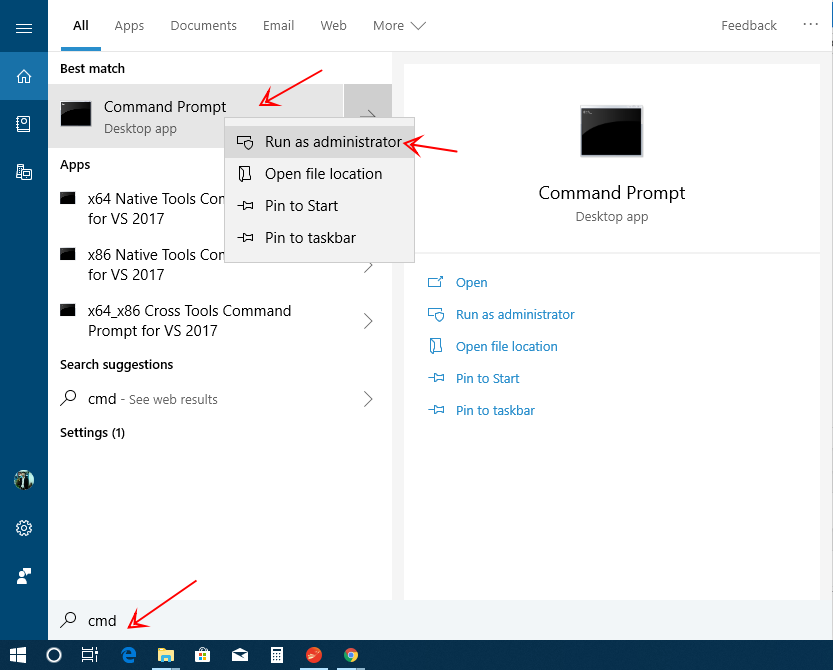
1.Open CMD with Run as Administrator
Important Note: You need to select “Run As Administrator” to get upgrade permission.
2. You need to copy the entire following code and paste it into CMD, then Enter. (It uses Microsoft’s Default Key to upgrade from Home to Pro):
DISM /online /Get-CurrentEdition
DISM /online /Get-TargetEditions
sc config LicenseManager start= auto & net start LicenseManager
sc config wuauserv start= auto & net start wuauserv
changepk.exe /productkey VK7JG-NPHTM-C97JM-9MPGT-3V66T
exit
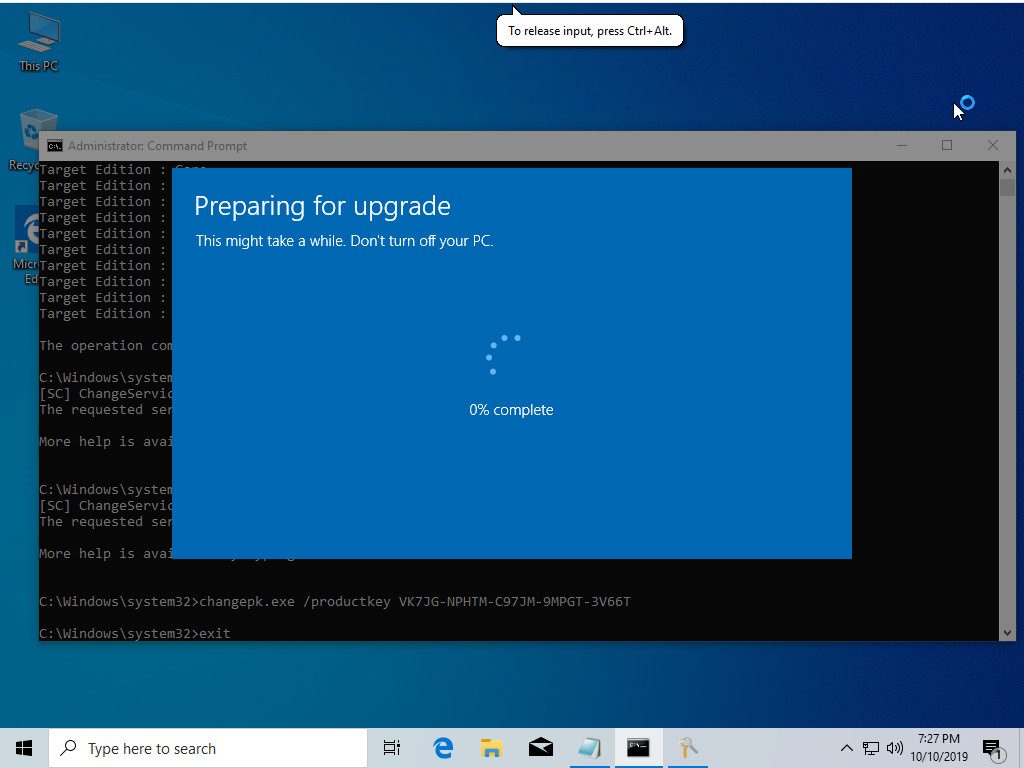
Note: If you see “Windows upgrade failed”, you restart your pc. It will upgrade Windows 10 Home to Windows 10 Pro. (It will show as Windows 10 Pro)
3. After the upgrade to Windows 10 Pro is completed, You need to Restart your computer and do the following steps to Activate Windows 10 Pro license:
- Open Settings.
- Click on Update & security.
- Click on Activation.
- Click the Change product key link.
- Type the 25-digit product key for the version of Windows 10 Pro. (License key in Email, If the key does not work please restart the computer and try step 3 again after a minute.)
- Click Next to complete the process.
4. Restart the computer to finish.
Method 3: Using the tool to create installation media (USB flash drive, DVD, or ISO file) to install Windows 10 on a different PC
- Open Windows 10 download page. Under the “Create Windows 10 installation media” section, click the Download tool now button to save the file on your device.
- Double-click the MediaCreationToolxxxx.exe file to launch the tool.
- Click the Accept button to agree to the Microsoft terms.
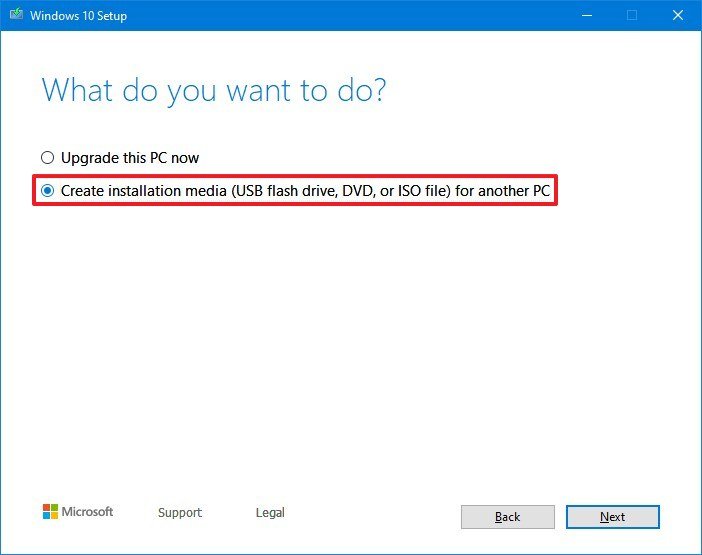
- Select the Create installation media (USB flash drive, DVD, or ISO file) for another PCoption.
- Click the Next button.
- Clear the Use the recommended options for this PC option (if applicable).
- Select the correct language, architecture, and edition of Windows 10. Quick tip: If you plan to install Windows 10 on multiple computers running the 32-bit or 64-bit architecture, then use the “Architecture” drop-down menu and select the Bothoption.
- Click the Next button.
- Select the USB flash drive option.
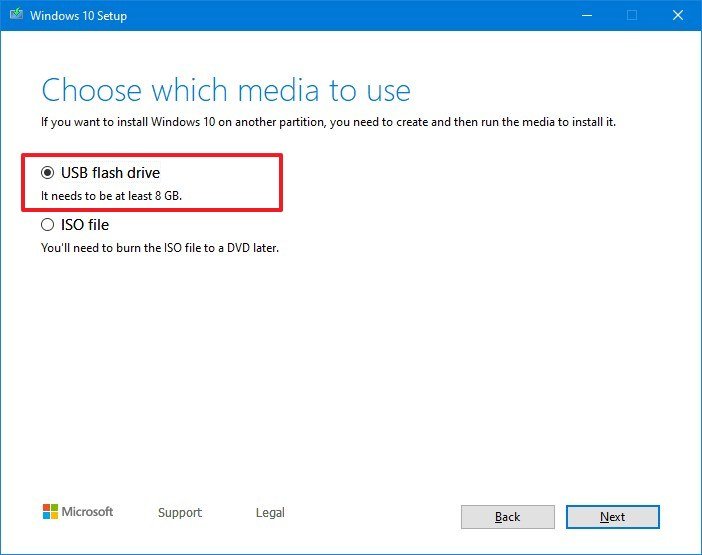
- Click the Next button
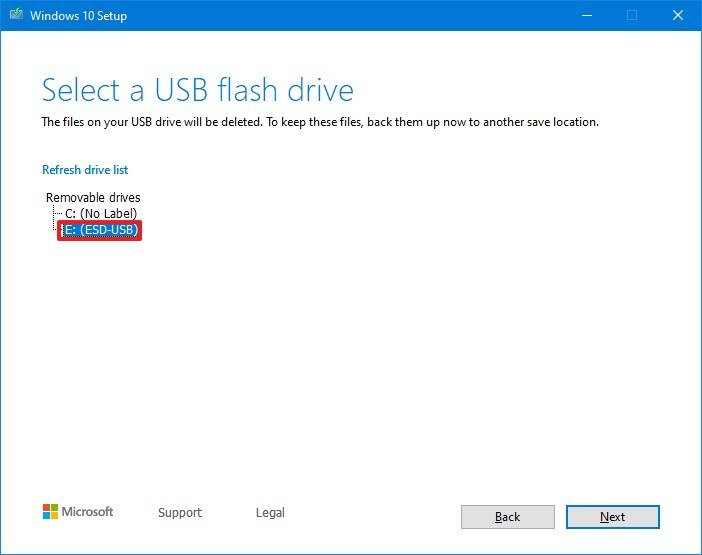
- Select the flash drive from the list.

- Click the Next button.
- Click the Finish button.


Once you complete the steps, the Media Creation Tool will download the required files and create a bootable media that you can use to start your device and install Windows 10.
Using the installation media you Created:
- Attach the USB flash drive or insert the DVD on the PC where you want to install Windows 10.
- Restart your PC.
If your PC does not automatically boot to the USB or DVD media, you might have to open a boot menu or change the boot order in your PC’s BIOS or UEFI settings. To open a boot menu or change the boot order, you’ll typically need to press a key (such as F2, F12, Delete, or Esc) immediately after you turn on your PC. For instructions on accessing the boot menu or changing the boot order for your PC, check the documentation that came with your PC or go to the manufacturer’s website. If you do not see the USB or DVD media device listed within the boot options, you may need to reach out to the PC manufacturer for instructions for temporarily disabling Secure Boot in your BIOS settings.
If changing the boot menu or order doesn’t work, and your PC immediately boots into the OS you want to replace, it is possible the PC had not fully shut down. To ensure the PC fully shuts down, select the power button on the sign-in screen or on the Start menu and select Shut down.
- On the Install Windows page, select your language, time, and keyboard preferences, and then select Next.
- Select Install Windows.
Method 4: Perform clean install of Windows 10 from ISO image (For computers that are using Windows 8 or Windows 10)
Here is how to clean install Windows 10 from ISO image file without having to create bootable USB or DVD.
Step 1: Download ISO install file on your email
Step 2: On your Windows 10 PC, where you want to perform clean install of Windows 10, back up all data as we are going to clean install Windows 10 by removing installed programs and personal files. So it’s a good idea to backup everything using a good backup software.
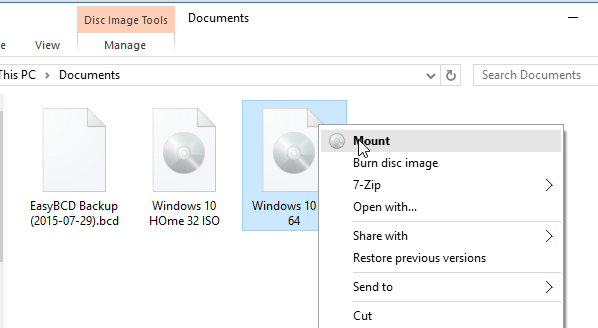
Step 3: Right-click on the Windows 10 ISO image file, and then click Mount option to mount the ISO image.
Step 4: Open up This PC, and then open up the newly mounted drive (containing Windows 10 installation files) by right-clicking on the drive and then clicking Open in new window.
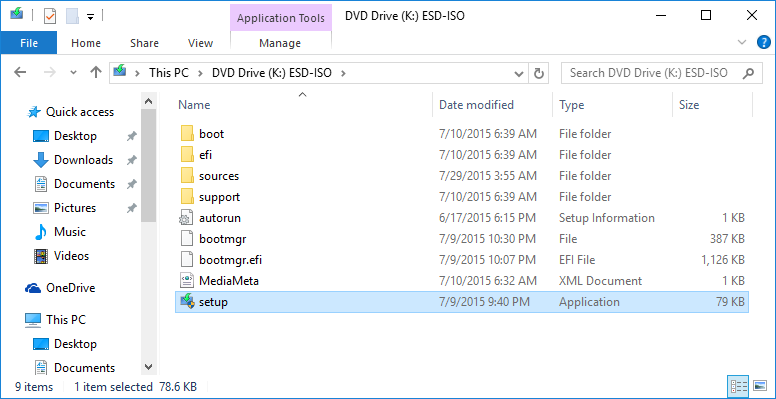
Step 5: Double-click on the Setup.exe file.
Step 6: When you see the following screen, select the first option labelled Download and install updates (recommended), or you can also select the option titled Not right now, as we can always download and install updates after clean installing Windows 10.
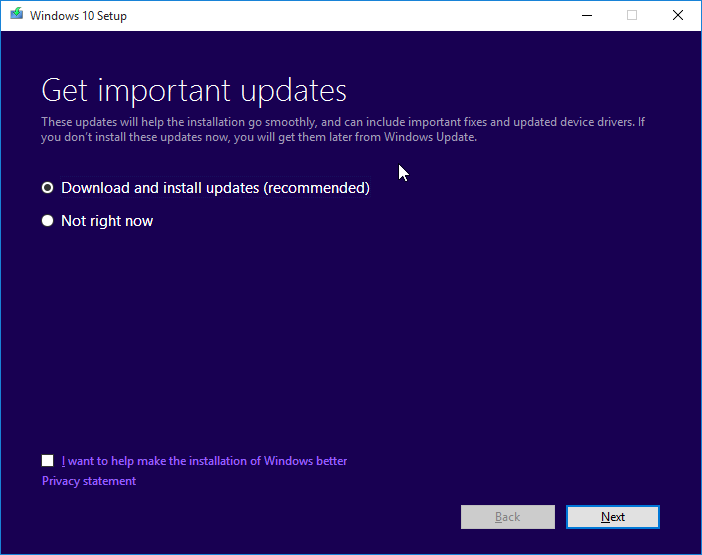
If you have selected Download and install updates option, the setup will check for available updates and download them if available.
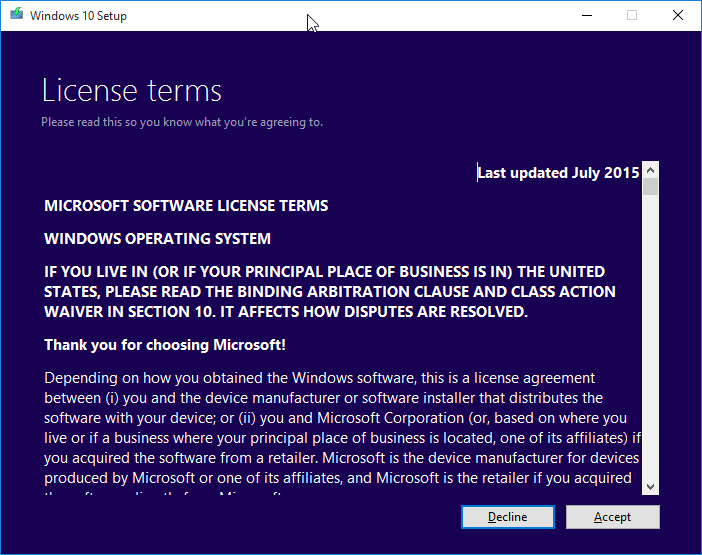
Step 7: Next is the user agreement screen where you need to click Accept button to accept the license terms to install and use Windows 10.
Step 8: Once again, the setup might start looking for updates and download them.
Step 9: Once everything is ready, you will see Ready to install screen.
Step 10: Here, select Keep nothing if you want to perform a clean install of Windows 10 by removing all installed programs and data. We have selected Keep personal files and apps as we don’t want to lose installed apps and important data.
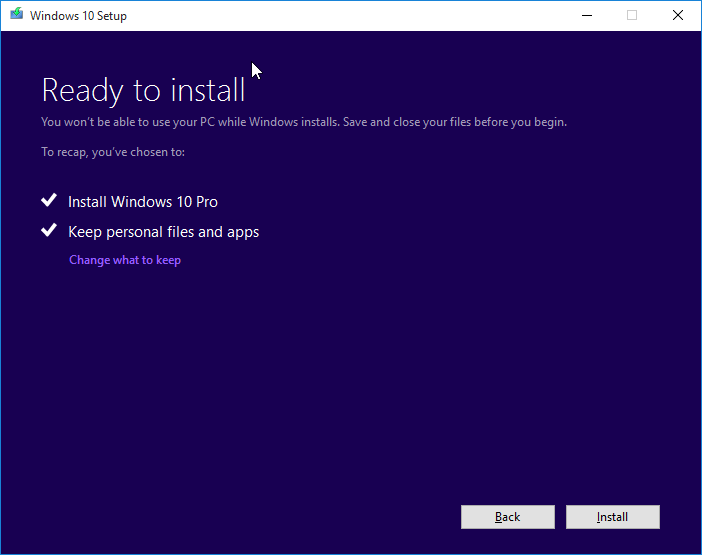
And if you want to keep you data, please select Keep personal files option by clicking Change what to keep link.
Step 11: Finally, click Install button to begin installing Windows 10.
Note that although the installation screen shows “Upgrading” message, it’s actually clean installing.
Method 5: Tutorial to clean Install Windows with free Windows deployment tool
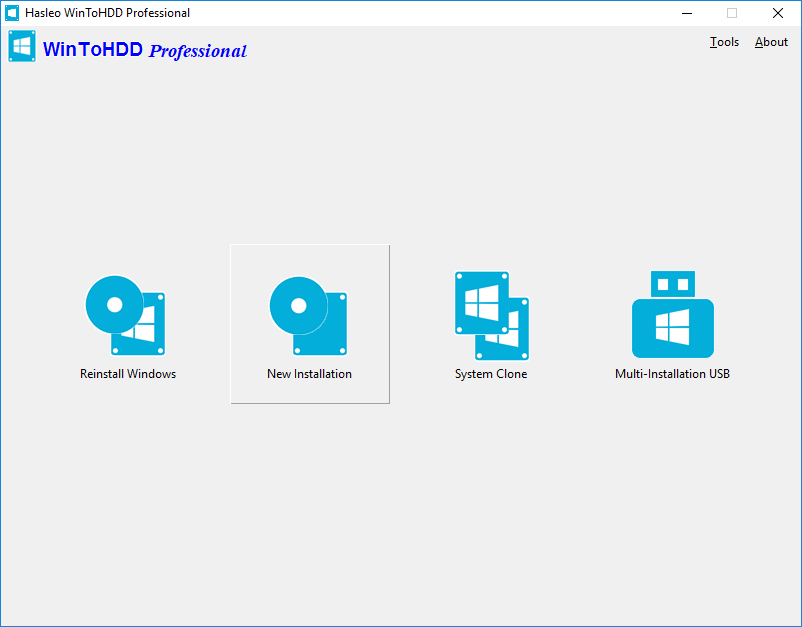
Here is how to clean install Windows 10 from ISO image file without having to create bootable USB or DVD. Using WintoHDD tool
Step 1: Download ISO install file on your email
Step 2: Download free Windows deployment tool: https://www.easyuefi.com/wintohdd/
Step 3: On your Windows 10 PC, where you want to perform clean install of Windows 10, back up all data as we are going to clean install Windows 10 by removing installed programs and personal files. So it’s a good idea to backup everything using a good backup software.
Step 4: Run WinToHDD, then click the  button.
- Installing from an ISO/WIM/ESD/SWM/VHD/VHDX File: Click the
 button, then click the
  button and select the ISO/WIM/ESD/SWM/VHD/VHDX file from the open dialog box.
 - Installing from a DVD drive: Insert the Windows installation CD/DVD into your CD/DVD drive. Once the CD/DVD is being detected in Windows, then click
 button and select the CD/DVD drive in the drop-down list. If your CD/DVD drive is not correctly recognized by WinToHDD, you need to click the
  button for the program to recognize the CD/DVD drive.
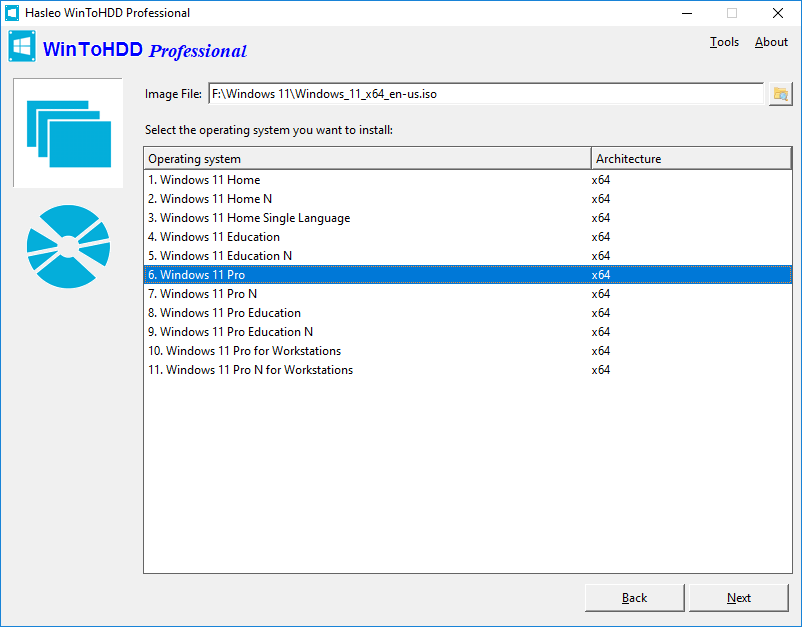
Step 6: WinToHDD scans for and lists installable operating systems. If you see the edition of Windows you want to install, select it, then click “Next”.
![]() NOTE:
NOTE:
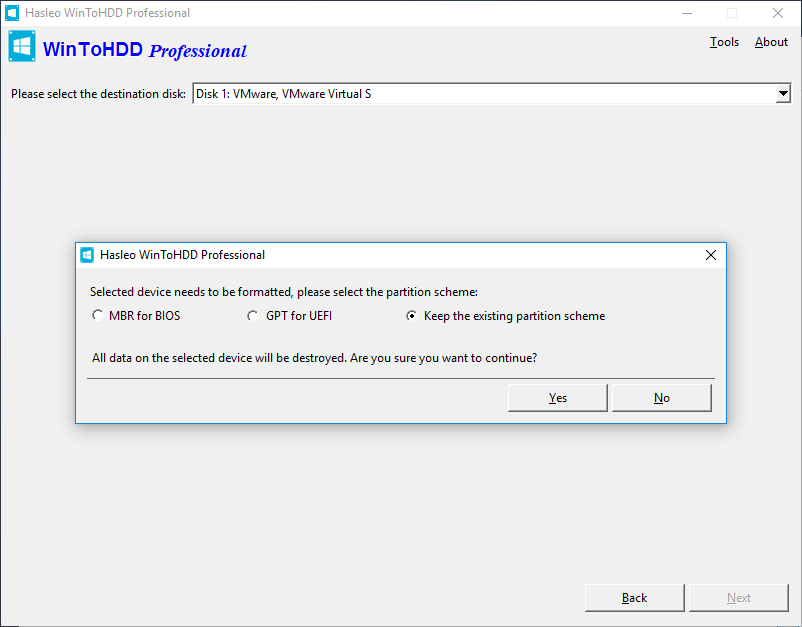
- The “MBR for BIOS” and “GPT for UEFI” options will cause the destination drive to be formatted, so all data on the drive will be destroyed.
- If you choose “Keep the existing partition scheme”, you need to manually prepare the partitions on the disk before this step, and here is the user guide on how to manually prepare partitions for the destination disk.
Follow these simple steps, you can install Windows onto disks other than the one where your Windows operating system is installed with free Windows deployment tool WinToHDD easily.